

System Settings and Configuration
Contents
Settings
Asset status
Asset category
Asset location
Company settings
Default values
Document template
Manufacturer template
Templates
User templates
User groups
CCQ offers administrators a comprehensive range of configuration options to set up the system according to their organization’s needs and preferences. The system provides tremendous flexibility by allowing users to customize several aspects that affect the way their company conducts asset management and quality control.
By clicking the settings ![]() icon on the CCQ banner up top, you will find the numerous configuration options of the Asset Management module. This is where you control the basic functionality of the system; manage users, create different asset registration templates, and organize standards, laws and regulations, etc. This settings menu will only be visible to you if you’re an admin.
icon on the CCQ banner up top, you will find the numerous configuration options of the Asset Management module. This is where you control the basic functionality of the system; manage users, create different asset registration templates, and organize standards, laws and regulations, etc. This settings menu will only be visible to you if you’re an admin.
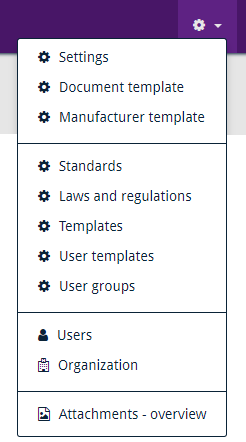
Settings
In Settings, you define different statuses for your assets that indicate whether they are available, in use, and so forth. Under Asset Categories, you determine the various types of assets you’ll be working with in the system and possible Asset Locations can also be specified here. In Company settings, the company’s preferred currency for trading can be identified and you have the ability to limit file sizes in the system. Further descriptions of different settings and configuration options, are to be found in subsequent sections.
Asset status
In this tab, you define the varying status of your assets. As was previously mentioned in chapter 2.2.1, you can set the status of the asset so that it’s visibly clear whether it’s available or not. You could for example define a status for being in use, whether the asset’s in maintenance, or simply lost. CCQ can provide you with predefined values for this tab, by clicking Insert default value under Actions. Default values will be further discussed in chapter 5.1.5.
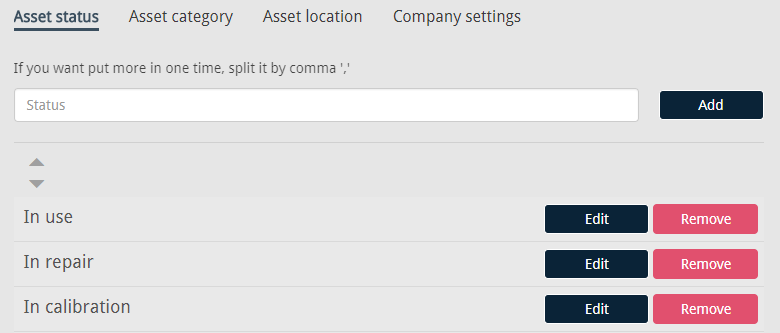
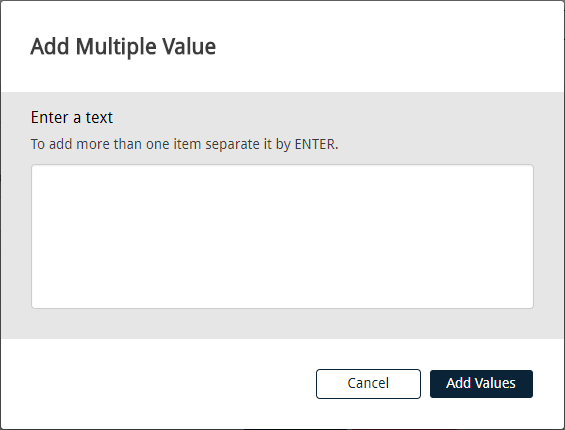
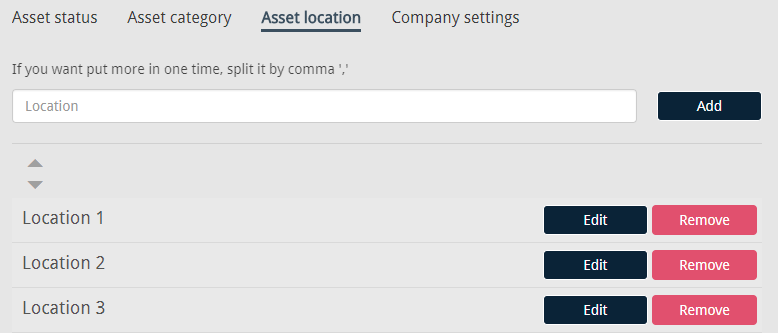
Under Actions, you have another option called Add multiple values. You can use this feature when the intention is to add multiple asset statuses at a time. A dialog window appears, where you enter the different values, separated by a newline. Then you click Add values and the statuses get added to the list. You can either sort your list manually by “dragging and dropping,” or sort it alphabetically by clicking the up and down arrows. This feature applies to the Asset category tab and Asset location as well.
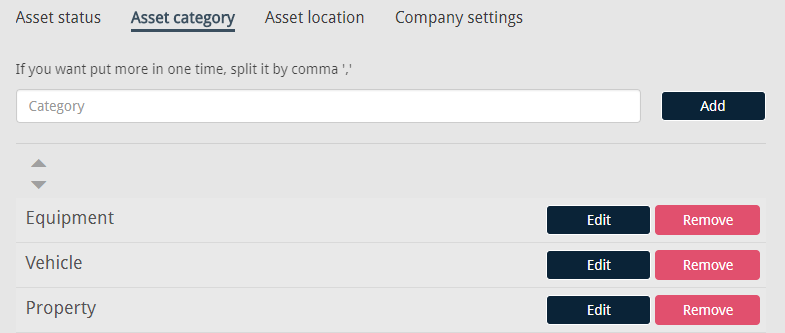
Asset category
This is where you determine all the different types of assets that belong to your company. Examples include vehicles, equipment, furniture or even property. The same rules apply as in the status tab, you either enter one name at a time, or several separated by a comma. As before, you can sort the list by “dragging and dropping” or clicking the up and down arrows. Names of categories can be altered and deleted if necessary.
Asset location
There’s no use in investing in assets if you don’t keep track of where they are. If the company operates in several parts of the country or has its premises in more than one location, these Asset locations can be defined here. If your company operates a warehouse somewhere or an inventory, you can list the various locations in this tab.
Company settings
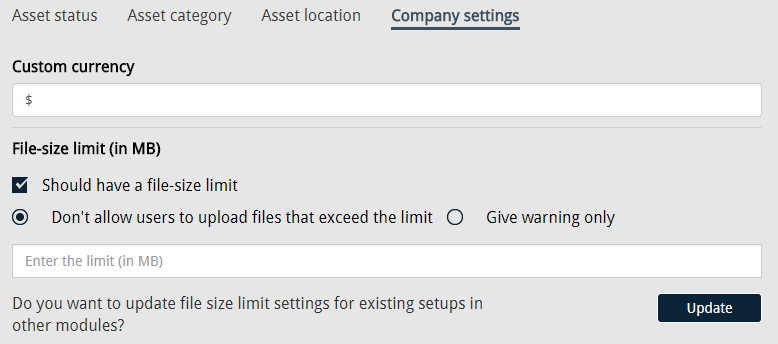
In the Company settings section, you can specify the company’s preferred currency for trading. The currency symbol will then be added to all figures in the system, related to prices, cost and expenses. You have the ability to limit the size of files that users upload to the system. By marking the Should have a file-size limit checkbox, an input field appears where you can enter the limit in megabytes. You also decide whether the system gives the user a warning when he tries to upload a file that exceeds the size limit, or prohibits the action altogether.
If you want to make the file-size limit settings consistent across all modules, you can do that here by clicking Update below.
Default values
Under Actions, you have an option called Insert default value. When you apply this action, predefined configuration values for asset status, asset category and asset location are inserted into the system settings. The aim is to give first-time users an idea of what kind of values can be expected when classifying different documents. The default values are currently available in four languages; English, Icelandic, Swedish and Polish. Unfortunately, Spanish speaking users will have to wait a bit longer for the translation and make do with the English values.
Please note that these default values are by no means set in stone, as they are only meant to give an example of how the system can be configured. They should be altered to better suit your company’s needs.
Document template
The CCQ system comes out of the box with a few default templates that assist you in registering your various assets. Useful as these default templates can be, they are rather limited when it comes to assets that are very distinctive or specific to a certain industry. For this reason, the ability to create your own registration templates is incredibly valuable when classifying your assets.
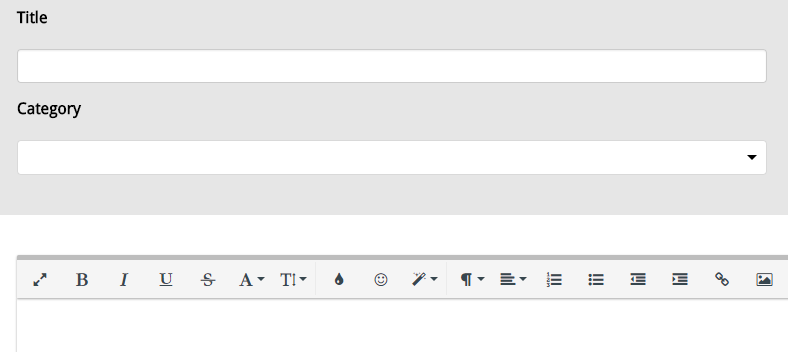
The ability to create Document templates for different assets, is one of the most crucial features of the Asset Management module. You’ll find this option under the settings ![]() icon in the CCQ banner. The purpose is to provide reusable templates for various types of assets, and you’re advised to diligently fill out every field in the template. As before, CCQ provides you with a few default values that can be used or altered at will. By clicking Actions, you have three options to choose from: Electronic equipment, Motorized vehicle, and Real estate.
icon in the CCQ banner. The purpose is to provide reusable templates for various types of assets, and you’re advised to diligently fill out every field in the template. As before, CCQ provides you with a few default values that can be used or altered at will. By clicking Actions, you have three options to choose from: Electronic equipment, Motorized vehicle, and Real estate.
There’s no limit to the number of input fields you can have in your template and you have a multitude of options. You can choose between plain text input fields, dropdown lists, text areas, numbers, dates, checkboxes, radio buttons, and user selection. User selection allows you to pick employees from the staff list. It’s easy to move fields up and down the template, just click the up and down arrows on the right of each field – and “X” to delete them. Click Add to add new ones. Please note that the standard fields found in default asset templates always appear at the top of every custom document template. The custom fields that you create, function as kind of an extension and appear in continuation right below the standard (default) fields.
Should you want to create a custom document template for a specific kind of component, be sure to mark the Is component checkbox. You can control the layout of the input fields in the template by marking the checkbox Should split inputs into two columns. If you don’t mark it, the input fields will span the entire width of the template – resulting in only one column. If you have people in your company speaking different languages, you can even provide translations for the names of the fields you create.

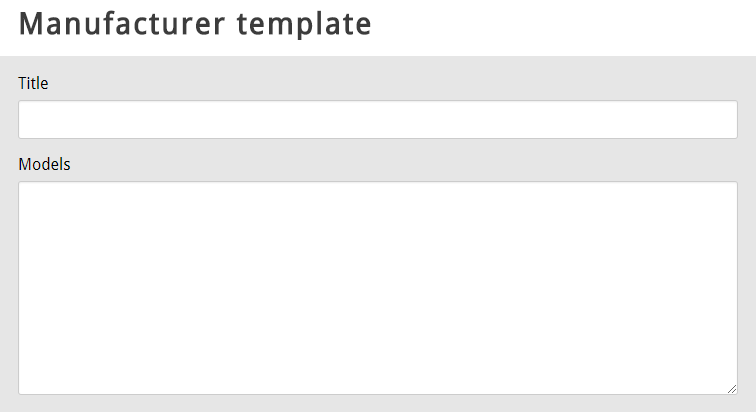
Manufacturer template
The Manufacturer templates that you create, dictate the values that appear in the Manufacturer and Model fields, in each standard asset registration template. The title that you give to the manufacturer template corresponds to the values in the Manufacturer field, and the models that you list below become available in the Model field.
The Manufacturer that you select, dictates what options appear in the Model field that comes next. To illustrate just how this works, let’s take an example. Let’s say that you enter Toyota as the Title, and then Prius, Corolla, Yaris, and Hilux as Models. Subsequently, in the asset registration templates, Toyota becomes available in the Manufacturer field, and Prius, Corolla, Yaris, and Hilux become available in the Model field – as long as you select Toyota as the manufacturer.
Templates
CCQ presents you with the ability to create templates for assets, in order to potentially facilitate the process of registering new assets. This should reduce paperwork as well as establish consistency between registered assets. To fetch a predetermined template for an asset, you click the ![]() icon in the text editor, as was covered in chapter 2.2.6.1.
icon in the text editor, as was covered in chapter 2.2.6.1.
User templates
Within an organization you usually have a wide assortment of employees. You have administrators, executives, project managers, analysts, consultants, etc. CCQ offers administrators the ability to create different user templates or roles, and assign them to general users of the system. In a typical user template, you need to specify all the details that are required when you’re creating a new user. The process of creating a new user will be further discussed in chapter 6.2.
In the template, you determine users’ permissions, their default language and dashboard settings. Bear in mind that you’re creating a template for a group of employees, but more often than not you need to make some additional adjustments for individual employees. This should speed up the process when you’re creating new users.
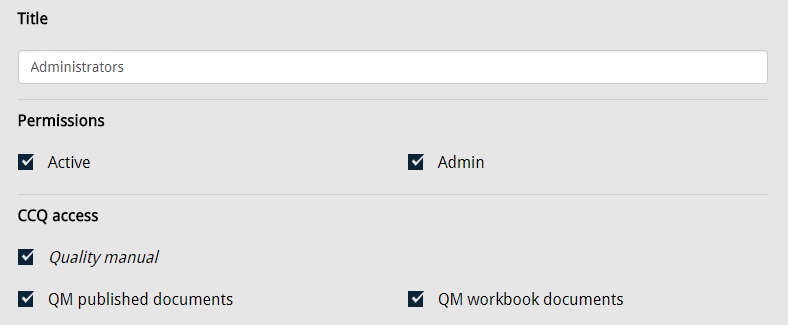
User groups
This is where you define different groups of people that you want to send an email to, simultaneously. It can be extremely convenient to create different mail groups, in order to avoid adding each name each time you want to send them an email. For example, when creating a new asset you can add a mail group to the list of persons that will receive a notification when the asset needs maintenance.
