
Incidents & Complaints
Contents
Filtering incidents & complaints
All incidents & complaints
Open incidents & complaints
Closed incidents & complaints
My incidents & complaints
Incidents & complaints from web
By <custom categorization>
The Actions button
Change table configuration
History
Close procedure
Reopen procedure
Messages
Get shareable link
Filtering incidents & complaints
When you’re inside the Incidents & Complaints interface, you can select different views by filtering out the incidents that you want to inspect. There’s a drop-down list with different filtering options at the top of the interface. The incidents then appear in a list below, in accordance with the selected filter. The following are descriptions of the filter options available in the Incidents & Complaints module.
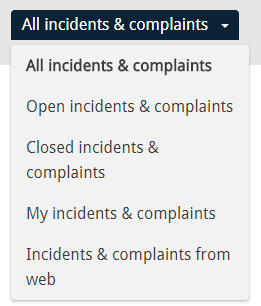
All incidents & complaints
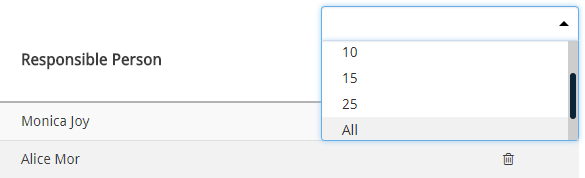
When All incidents & complaints are selected, you obviously get an overview of all incidents and complaints in the system. You can control how many documents are shown on the page you’re viewing, via a drop-down list on the top-right side. The options you’re given are 5, 10, 15, 25 or simply all documents.
Open incidents & complaints
With this filter you get an overview of all incidents and complaints that are currently open, i.e. those that are still being processed and not yet closed.
Closed incidents & complaints
If you’re interested in reviewing old incidents to examine how they were resolved, you can use this filter to retrieve a list of all Closed incidents & complaints.
My incidents & complaints
When you select My incidents & complaints you get an overview of all open incidents that you are responsible for, or processing at that time. Note that the processing stage of the complaint may determine whether it appears in this overview. Even though you’ve been designated as the person responsible for the complaint, the document won’t necessarily appear as your incident if it’s at the solution stage or in follow-up. At these stages, the incident becomes the responsibility of the resolver or the individual tasked with the follow-up – and it appears in their list.
Incidents & complaints from web
With this option you can filter out incidents and complaints that have been submitted online. In some cases, these submissions may be irrelevant messages or spam and for that reason such incidents need to be reviewed and validated before they’re registered in the system.
By <custom categorization>
Given the immense diversity of companies, users of CCQ are allowed to create custom categories to classify and sort their incidents and complaints. The custom category is given a name and if it’s marked to display as a drop-down list, it becomes visible as a filtering option here. When this option is selected, an additional filter appears on the side of the incident list. This filter contains the previously defined category values, which you can use to sift through the incidents even further. For detailed instructions on custom categorization, please refer to chapter 4.1.6.

The Actions button
![]()
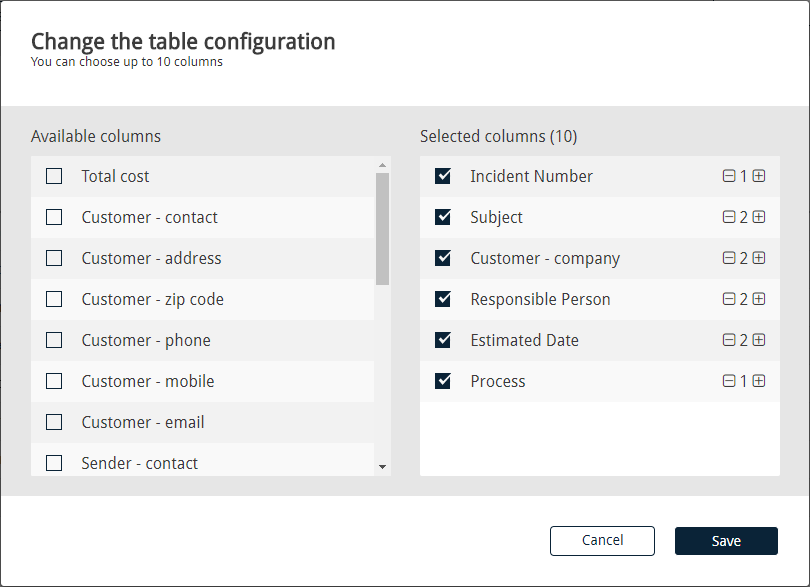
Change table configuration
If you’re viewing the list of Incidents & Complaints and you want to change the layout of the table, you have a shortcut for that purpose under Actions. You get a dialog window listing the table columns that are available, you select the ones you want displayed in the table, and click Save. You can control the width of the columns by clicking the plus and minus buttons on the right-hand side of each selected column. Note that the table has a capacity of only ten columns, which means that if you select ten different columns to display, you won’t be able to change their width.
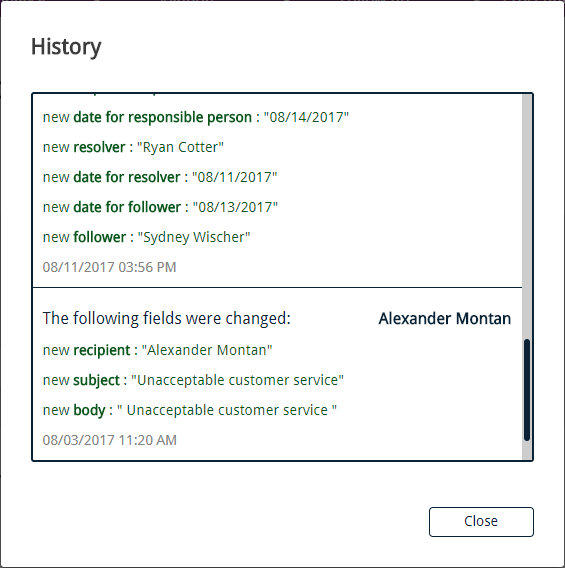
History
When you’re viewing a certain incident or complaint, and you want to examine its history, you can do so by clicking History under Actions. A dialog window opens that shows you all changes that have been made to the incident since it was first registered, who made them and when they occurred. It essentially gives you a good overview of the process or course of events.
Close procedure
When an incident or complaint has been registered in the system, it can be closed at any time during processing. It doesn’t matter whether the incident hasn’t been resolved or followed up – you can always click Actions and choose to Close the procedure. Consequently the complaint is closed and nothing can be altered, unless it’s reopened.
Reopen procedure
When an incident or complaint has been closed, this option appears under Actions. By Reopening the procedure, the process resumes and you can proceed from where you left off and make all the changes you want.
Messages
When processing an incident or complaint, it’s easy for resolvers and the persons responsible to pass messages back and forth between each other. If the Messages option under Actions is clicked, a dialog window is displayed where the choice is between Sending a message to someone, or Registering an email concerning the incident. All sent messages and registered emails get stored in the window itself, with information about sender and receiver, as well as timing. Information about the communication is recorded in the History of the incident as well.
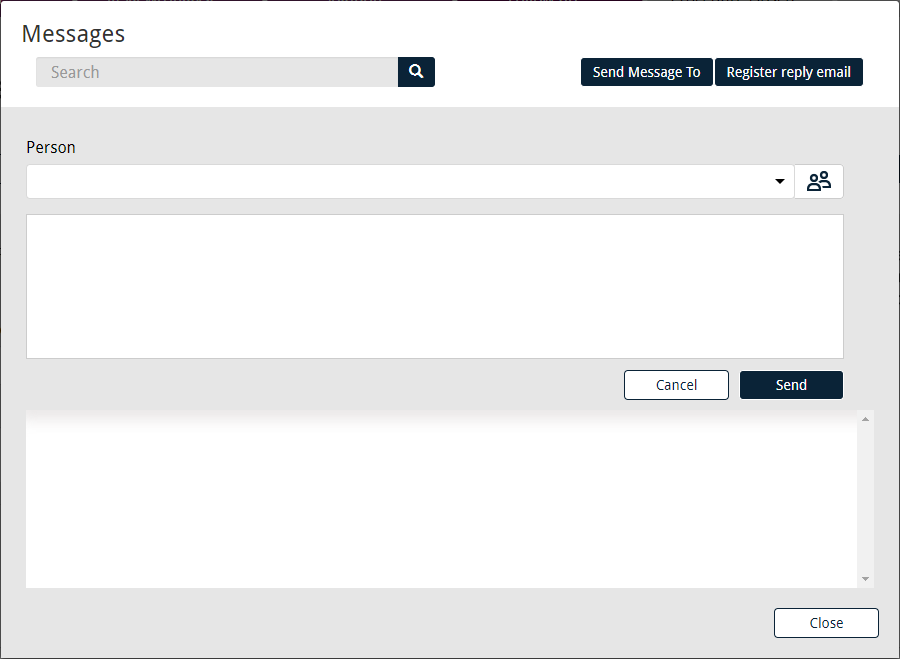
If you decide to send a message, you select the recipient from the company’s staff list and add comments or instructions you want to convey. The message is saved and the recipient receives an email containing a link to the incident. On the other hand, if any email correspondence has occurred regarding a particular incident or complaint, you can register the email in the system. This is done by specifying the sender’s email address and then copying the contents into the textbox below.
You have the option of replying to certain messages or registered email, by clicking the small mail ![]() icon to the side of them. A small textbox appears right below the message, where you can write a short response.
icon to the side of them. A small textbox appears right below the message, where you can write a short response.
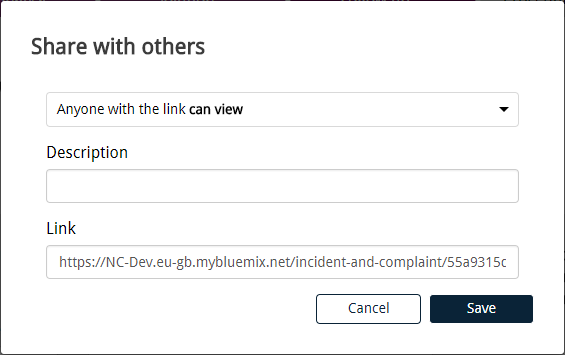
Get shareable link
When you create the link, you can control the access to the complaint – i.e. you can determine whether the person you share the link with can edit the document or only view it. Note that people don’t necessarily need a CCQ account to view or edit the complaint.