
New Document
Contents
General
Categorization
Approvers
Access
Documentation
Text editor
Recent changes and comments
Attachments
Links in Microsoft Visio
When you are in the Documents interface and you want to create a new quality document, you simply click the New document button.
![]()
If you are in the dashboard, you can find an equivalent button in the side navigation menu that appears when you click the ![]() icon.
icon.
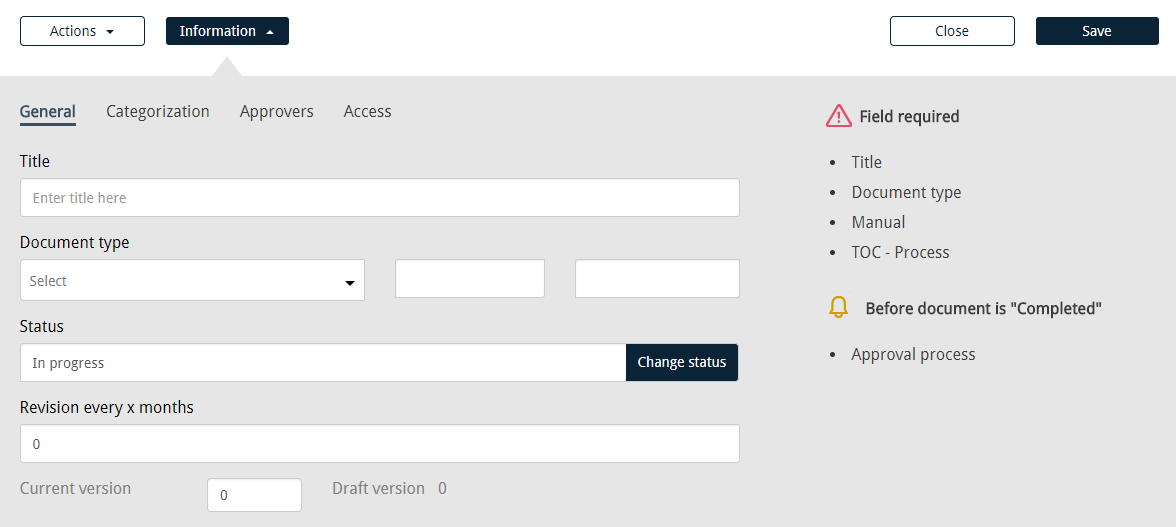
A template for a new document appears with four tabs at the top of the interface. The tabs are General, Categorization, Approvers and Access. On the right-hand side, you can see fields that are required before you can save the document and the requisite fields before the document is completed. When all necessary fields have been filled out the document is saved (without closing) by clicking Save and then you hit Close to close the document.
General
In the General tab there are fields that specify the title, document type, status and revision date of the Quality document.

- Document type
Documents can be classified in various ways, e.g. as policy documents, procedures, etc. As noted above, you can define different types of documents in the Settings menu, but this will be covered in more detail in chapter 7.1.1. The various document types that you define are retrieved from a drop-down list, but the two fields that follow denote the document number. It consists of an abbreviation of the document type (three-character code) and an exclusive running number. When the document is saved, the system automatically assigns it a number, but the user also has the option of issuing a number himself. - Status
When a document is created, it gets the status In progress. While in this status, the document cannot be approved – it’s not until processing of the document is finished and its status is changed to Completed, that the approval process starts. The document cannot be altered after it has been marked as Completed, unless it’s checked out and set In progress again. The reason for this is to ensure that it’s not possible to change documents after approval – only the approvers can grant changes, since all modifications need to go through them. All changes to document status are automatically saved in the system. - Revision every x months
The maximum time that may elapse between reviews of the document should be determined. One month before a scheduled revision, the editors of the document will receive emails saying that a review is pending, and the document will appear on the task lists of the employees on its editorial committee. If you don’t want the document to be revised, you simply insert 0 months into the field. - Current version
If you want to stick to a particular version number, you can configure that here. If not, you write nothing in this field and the document is automatically assigned a version number.


Categorization
The categorization of a quality document can be divided into three steps. First, you determine which manual the document belongs to. Second, you specify with which process the document is associated. Third, if the document should be linked to some external reference, you can make that reference under References to requirements.
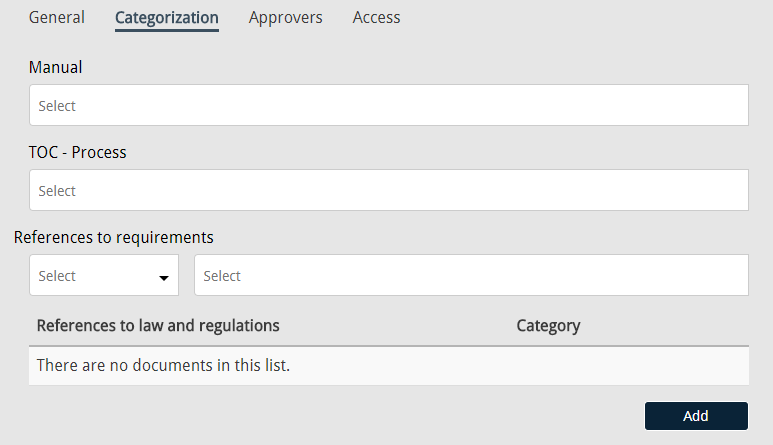
- Manual
Different manuals can be prepared for various departments or divisions within the company. For each document, it’s mandatory to designate in which manual it will be included. Note that each document can appear in more than one manual. As noted above, manuals are registered in the settings menu of the system, see chapter 7.1.2. - TOC – Process
In order to save the document, it’s also necessary to fill out this field. Every manual contains at least one process, by which each document can be categorized. Each document can be associated with more than one process. Processes are registered in the settings menu of the system as well, see chapter 7.1.3. - References to requirements
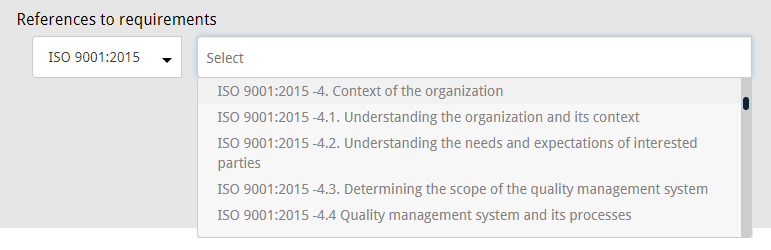
If the document is prepared in compliance with a certain standard, you can make an explicit reference to it. There is no limit to the number of references a document can carry. When referring to an external standard, you begin by selecting the appropriate family of standards in the drop-down list on the left-hand side in References to requirements. In the textbox to the right, another list appears containing the family’s standards, and then you choose the one you want to refer to. New references to standards can be configured in the settings menu, see chapter 7.3. - References to laws and regulations
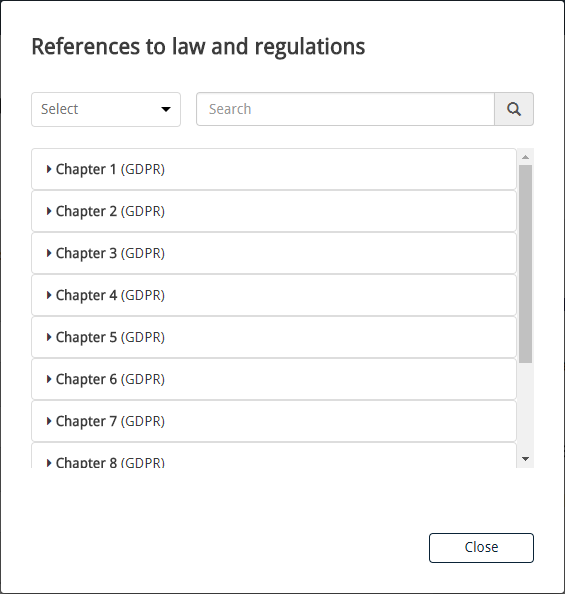
When a document is created in accordance with a certain law or regulation, you can make a reference to it. To choose an external reference you begin by clicking Add and a dialog window opens, containing every law and regulation defined in the system. You select the relevant body of laws or regulation from a drop-down list and then choose the provision you want to refer to. There’s also a search box which you can use to look up a particular reference. New references to laws and regulations can be configured in the settings menu, see chapter 7.4.


Approvers
In the Approvers tab you can specify the party that’s responsible for the supervision and approval of the document before it is published. You begin by selecting which approval process is suitable for the document and then assign the relevant roles (approver, publisher, etc.) to different individuals within the organization. You can create a mail group where you select persons that will receive a notification when the document is published. You also have the option of appointing the employees that need to confirm reading of the document. The employees receive a notification about a document that’s been published and when they’ve looked it over, they can confirm that they’ve read and understood its contents by clicking a confirmation button.
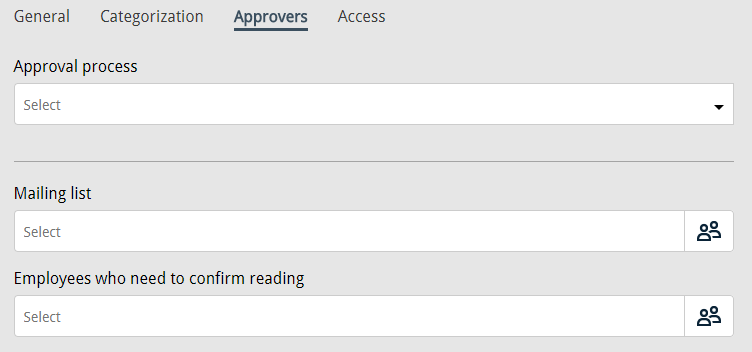
The employees can be selected one at a time by clicking the relevant input field and finding the right people in the register that appears. At the top of the roster you can sometimes find mail groups previously defined in the system which, if applicable, can considerably expedite the process. Another way to pick out the employees is to click the ![]() icon next to the textbox, which opens the address book. You select the people from the staff list by marking their checkboxes and when you click OK, they are transferred into the relevant textbox.
icon next to the textbox, which opens the address book. You select the people from the staff list by marking their checkboxes and when you click OK, they are transferred into the relevant textbox.
Access
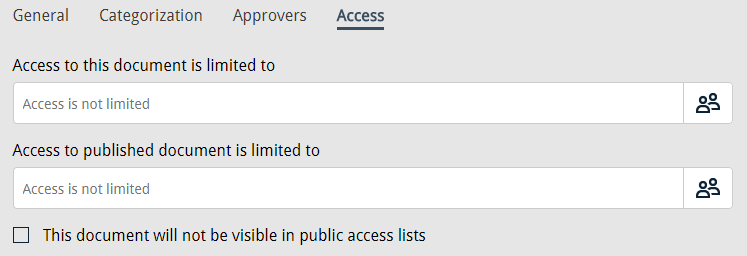
The Access tab gives you the possibility of restricting access to the quality document in question. You can both limit access to the document when it’s In progress or Completed, and when it has been published. If you select some people in either of these fields, only they have access to the document. If nobody is selected, everybody has access to the document. There’s also a checkbox where you can control visibility of the document to the public.
Documentation
When you are finished with the formalities and have filled out all the required fields, you have the option of minimizing the information field by clicking the Information button at the top of the document. The next step is then to focus on the content of the document.
![]()
In the Quality Manual, you essentially have two options to create content. You have the standard text editor where you can write text, insert tables, etc. Then you have the ability to add attachments to the document, either embedded or simply on the side.
Text editor
The inbuilt text editor comes with all the basic features. As expected, you are presented with a blank document where you can begin typing. You have a host of formatting options for setting the font size and style, controlling line spacing and indentation, etc. You can insert tables, pictures and video, and a nice feature allows you to get links to other quality documents in the system.

By clicking the ![]() icon, you can put the text editor into full screen mode to see more of the document that you’re working with. This stretches the editor to the width and height of your browser window.
icon, you can put the text editor into full screen mode to see more of the document that you’re working with. This stretches the editor to the width and height of your browser window.
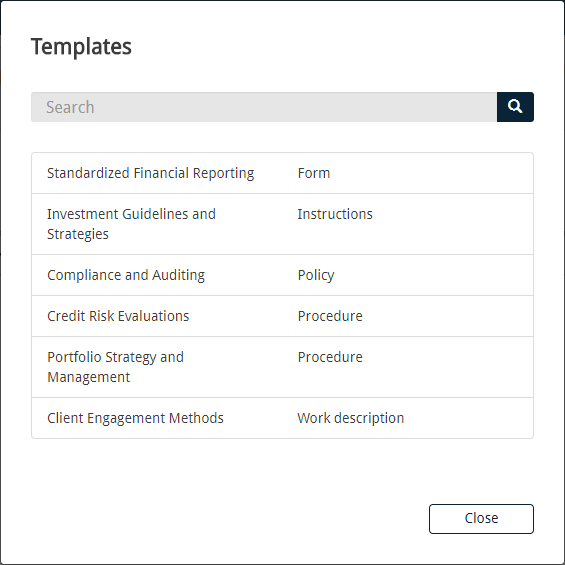
Another feature allows you to fetch predetermined templates for your document. In the settings menu you can create different templates that you can use in the editor. This should facilitate the process of making new documents and establish a kind of consistency. This will be covered in more detail in chapter 7.5. To get a template for your document you click the ![]() icon in the text editor. You get a list of the templates that you’ve already created in the settings menu, and then you select the appropriate one.
icon in the text editor. You get a list of the templates that you’ve already created in the settings menu, and then you select the appropriate one.
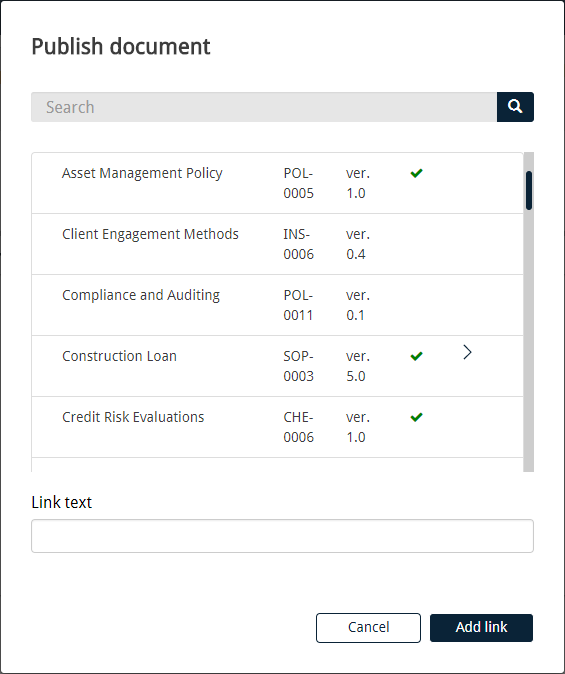
By clicking the ![]() icon, you will receive a list of documents (both published and those that aren’t) and attachments that you can search through and get links to. There’s no need to manually update links when creating new versions of the document, as that should happen automatically.
icon, you will receive a list of documents (both published and those that aren’t) and attachments that you can search through and get links to. There’s no need to manually update links when creating new versions of the document, as that should happen automatically.
Recent changes and comments
Down at the bottom of every document there’s an expandable section called Recent changes and comments which contains an open text editor. This can be convenient to use, to describe changes that you’ve made to a document – especially if the changes between versions are minor. As a result, readers won’t have to read the whole document to look for the changes.

Attachments
You can add as many attachments to a document as you want. There are various types of files you can attach to a document, ranging from simple text files to complex Visio diagrams. To add an attachment you simply click New attachment, which opens a file explorer where you choose the file to add. The selected file appears in a list at the bottom of the page which indicates that the file has been attached, but it isn’t uploaded to the system until the document is saved. On the other hand, if the intention is to remove an attachment from a document, you can do that by clicking the x behind the file.
![]()
The visibility of an attachment is controlled by two checkboxes, Publish and Display PDF. If you mark it published, you’ll be able to download the attachment in the published document. However, if you want to keep an attachment exclusively within the workbook copy of the document, you should not mark it published. If the file you’ve attached is a PDF document, the Display PDF checkbox is visible. If you check it, the attachment appears in the document as an embedded file, which means you won’t have to download and open the attachment to view it.

This offers the ability of displaying only the PDF version of the attachment for reading in published documents, but storing the work copy (the Word file) in the system for future revision. In fact, it’s strongly recommended to always upload both versions of the attachment in order to keep all work copies within the system, as it can be difficult to locate them when the author of the originals is unknown. This means that when you need to make some changes to, for example, a sizeable flowchart, you won’t have to search for the work copy outside the system, or worse – start all over again.
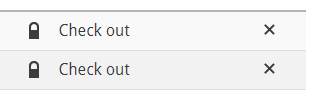
It’s easy to download a file that has been attached to a document, as you simply click on the filename itself. This way you can view the attachment without “checking it out.” However, if you need to make some modifications to the attachment, it’s best to check it out so that other users of the system can see that somebody is currently working on it. In order to do that, you either click the lock ![]() or Check out, and the file is automatically downloaded to your computer’s hard drive. Note that it’s only a copy that gets downloaded – the original attachment remains unaltered in the document.
or Check out, and the file is automatically downloaded to your computer’s hard drive. Note that it’s only a copy that gets downloaded – the original attachment remains unaltered in the document.
When you’ve finished your adjustments to the attachment and saved it, you need to Check in. A file explorer appears where you find and upload the new attachment, and simultaneously the old one is overwritten. It is advisable to open the attachment after submission, to ensure that the correct file was selected.

Links in Microsoft Visio
The use of Microsoft Visio is quite common when creating quality documents. Drawing Visio diagrams and flowcharts is only standard practice when you need to describe a work process or procedure effectively. It can be useful to add hyperlinks to a Visio drawing to emphasize a specific detail or subject. The hyperlinks can link to another page or document, a website or even an email address. The following instructions demonstrate just how this works.
You can add hyperlinks to any Visio shape, you only need to make sure the current drawing and the file you are linking to have been saved. Use the following steps:
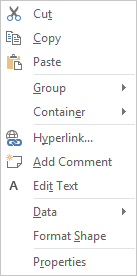
- Right-click on the shape that you want to link and select Hyperlink.
- A dialog window appears and in the Address field, you can do one of the following:
- Type the address of the website you want to link to (perhaps the address of another CCQ document). The address needs to begin with https:// or https://
- Type the email address you want to link to, beginning with mailto:
- Click Browse and navigate to the website you want to link to.
- Leave the field blank if you want to link to another page or shape in the current drawing.
- To link to a specific page or shape in the current drawing, click Browse next to Sub-address, and in the Hyperlink dialog box that appears, do the following:
- Choose which page in the current drawing you want to link to.
- Type the name of the shape that you want to link to.
- Choose the zoom level that you want.
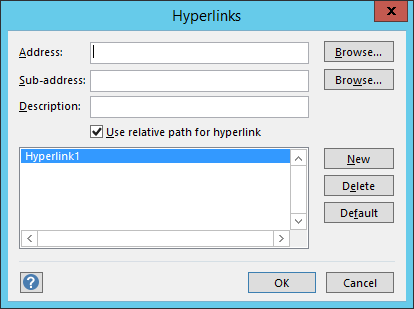
- To link to a specific anchor (or fragment identifier) on a webpage, type the anchor name in the Sub-address box.
- It’s usually best to leave the Use relative path for hyperlink checkbox unchecked, if possible.
- You can add multiple hyperlinks to the same shape, just click New and type in the information for the new link, the same way as above.